Friday, October 21, 2016

Image result for dot day

Happy International Dot Day!
September 15(ish) is International Dot Day, so we celebrated all week long by discussing the story of The Dot by Peter Reynolds and how, as artist, we are always discovering new ways to be creative and make our marks on the world.
I love talking about The Dot every year because it's a great reminder that we never stop growing and learning. This year, we "made our marks" with an old classic- shrink film!
Aside from very few students, nobody had had the experience of shrink film before. As soon as the students went home, the parents knew exactly what they were talking about- we knew it as Shrinky Dinks!

Each student was given a piece of shrink film to create their own "dot" with scissors and metallic sharpies. Then, we put the dots in the toaster oven to watch the magic of the shrinking happen. Students had the option to punch holes in their dots before shrinking them or add pins to the back. 

  
They came out great!!


Thursday, September 15, 2016

Image result for welcome back graphics

Welcome back to Graphic Arts!! We have a great new, bigger classroom that adjoins the computer lab and lots of fun projects on deck!

We began the school year with a collaborative mural. All classes got to join in and add their own artistic flair to our HUGE canvas. The quote, "Creativity is Intelligence Having Fun" is by Albert Einstein. 

Moxie "helping" to prep the canvas over the weekend

Instant mural, just add art students!

The Fun Begins!


We will continue to work on it bit-by-bit as a group over the next few weeks until it's complete and ready to hang!

Sunday, June 12, 2016

Impressive Apparal!

I can't express how impressed I am with the students' final project. With all of the excitement and time constraints that come with the end of the year, the students approached this project with so much enthusiasm and creativity! I can't wait to do this again next year (only, DEFINITELY allowing more time)!

The process of our apparel project, like most of our projects this year, included several complex steps. The students were tasked with choosing an item (we had everything from socks to t-shirts to tote bags!) and planning out a customized design.

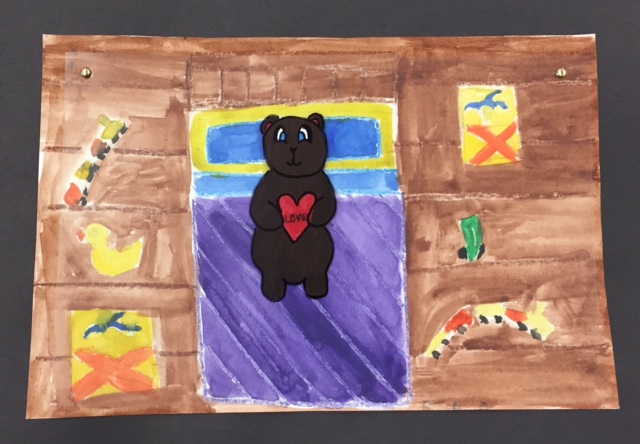
I began by showing them an example that I had created on one of our classroom aprons:


This was created by cutting a paper snowflake (see our color wheel project) out of this projects secret weapon.... FREEZER PAPER.

Freezer paper is available in the grocery store near the aluminum foil and wax paper. I had gone ahead and purchased a huge roll with a stand from Amazon because of the quantity I knew I'd need for the students. Freezer paper can be used for many things, but it is great for printing on fabric!

The process is to draw or generate a design, trace the design (with a light table) onto the freezer paper, and cut it out with an exacto knife. In the interest of safety, I purchased some excellent, safe, ceramic cutters for my classroom.
These cutters can cut only through one piece of paper at a time with a tiny ceramic blade. They cannot cut skin. Because the blade is so small, it takes a bit of practice to get the angle just right to make a nice, clean cut. I was impressed with the maturity of which the students handled the cutters. Although a challenge to learn, most students became quite capable of making precise cuts with the Slice cutters.

Once the students had cut out their designs, I used an iron to iron them onto the fabric. The plastic backing on the freezer paper is the real trick to this step. The plastic melts slightly under the heat of the iron and adheres to the fabric. The students could then use a sponge to apply acrylic paint over the design without having to hold anything in place or worry about the paint bleeding through. Once the paper is peeled off, the crisp, stenciled design is left behind.

I was able to take a few photos of designs that students printed onto their items. All of the visitors to our classroom over the last couple weeks have raved over the craftsmanship of the items. I have loved the chance to end the year with these artists personalizing items that I know they will have for years to come!

This printing method works well on all colors of fabric (as seen on our cardboard models!) Excuse the haphazard layout of some of these photos as we had to use every available inch of our room to dry them!


Wednesday, April 27, 2016

Pop Art!

Over the last few weeks we have continued to work with Pain.net creating our own versions of Pop Art. We specifically looked at the artwork of Andy Warhol:
We talked about the various parody's and imitations of his work and set out to create our own! I passed out the various digital cameras I have been collecting over the years (old, used digital camera donations are always welcome!) and the students took photos of eachother to use. Some students preferred not to use their own faces, and instead found their own pictures of characters, animals, objects, and celebrities. 

It takes a lot of steps to edit the photos, change the colors, and layer them onto a single canvas. The students have been extremely successful in learning the complex editing tools, making and resizing digital canvases, and working with layers. 

Here are some early samples of their work! (More to come!)


Wednesday, March 16, 2016

Harlem Renaissance

We took a week off from our work with Paint.net to learn about the Harlem Renaissance. The Harlem Renaissance was an important time in American History when the African American community produced an enormous amount of art, music, performance, and literature. We discussed the movement and watched a short BrainPop video. View the video HERE. (Brainpop username is sandwichps and password is brainpop)

Then we put on some blues and jazz music and created our own Harlem Renaissance folks! We recycled lots of cardboard, paper, and yarn for our creations. The forms are not anatomically correct, but are meant to be abstractions of the human form. They are showing expression and movement through shape and facial features. The students were asked to portray someone who is historically relevant in their actions or dress. We had portrayals of real people such as Langston Hughes and Josephine Baker as well as lots and lots of original designs.  

The designs lined up nicely in the hallway to create our own Harlem Renaissance Parade!


Thursday, February 11, 2016

Building BLTs

Last week we started working with Paint.net as a photo editing software. We are using Paint.net over Photoshop for a couple of reasons. First, Paint.net is a free program that is downloadable on any mac or PC computer. If the students would like to work on projects at home, they are able (with parent permission of course) to download Paint.net and the program will look nearly identical to what we are using in class. Secondly, the computers we are using in Graphic Arts are quite old at this point. The version of Photoshop we have is dated and runs slowly which is frustrating when you're trying to learn something for the first time.

If you'd like to download Paint.net on home computer, it can be found at www.getpaint.net

The first project we are doing in paint.net is to create a BLT sandwich! The purpose of the project is to learn how to use the most popular editing tools, how to create and organize layers, and how to utilize shortcut keys to work more efficiently. The classes are moving along at different paces, but so far all are successful.

The BLT project in Paint.net looks like this:


Bon Appetit!

Mystery Artist of the Month!!
January's mystery artist was "10 Marilyns" by Any Warhol. February's mystery artist is below:

To enter the raffle, you must identify the artist and the title of the artwork. Good Luck!!


Monday, January 11, 2016

Piskel Practice

This week we will be creating our own animated pixel images using Piskel.
The editor can be accessed at www.piskelapp.com
Students can sign in with their school email and password.

Students are creating an image, and duplicating the slides so that they can make small changes.


When all the slides are played together you get an animated effect:

This is the type of program that is easy to learn, but can be tricky to master. Once the students get a little more practice I'll be sure to post some of their creations!


Friday, January 8, 2016

January Mystery Artist Contest

MYSTERY ARTIST OF THE MONTH!
This month's Mystery Artist is......


Yes, that's Marilyn Monroe, but no, that's not the title! We will be looking at more examples of this famous artist's work and make some pop art of our own this spring!

Happy New Year!


The lead up to the holidays and winter break was a crazy one! Students participated in lots of special activities which was great! This week has been a lot of getting reorganized and tying up lose ends so that we can change gears and start something new. 

As promised, here are some more great examples of the completed Animation Cel projects. The multi-layer concept was not easy, but students were creative and successful!